July 12, 2012

rise a shine, it's breakfast time !

What do you do on your days off from work? Guess what I do....

Still guessing??

:)

Anyway, I made these whirligig buns with peaches and cinnamon and whipped cream for the baby shower, and I have been thinking about them ever since. The recipe is so easy.. although I have two notes:
1. You can use active dry yeast, and just throw it into the dry ingredients. It still works, it doesn't taste 'yeasty', and it still rises in just the same amount of time. You do still have to use 3 packets.
2. Leave the dough sticky. Don't try to add too much flour. They taste way, way better when the dough is sticky.

The author of the blog post where I found this recipe says it's a great thing to do when it gets cooler. I agree, and they are also not bad in the summer time! They only take 25 minutes to bake, so if you get up early enough you can have them done before it gets too hot.


Today, I filled them with raspberry preserves and chocolate shavings...


They were.. are, really good. I'm still snacking on them.

Also today, attempted vanilla ice cream, but it's still in the freezer, so we wait for now.

June 17, 2012

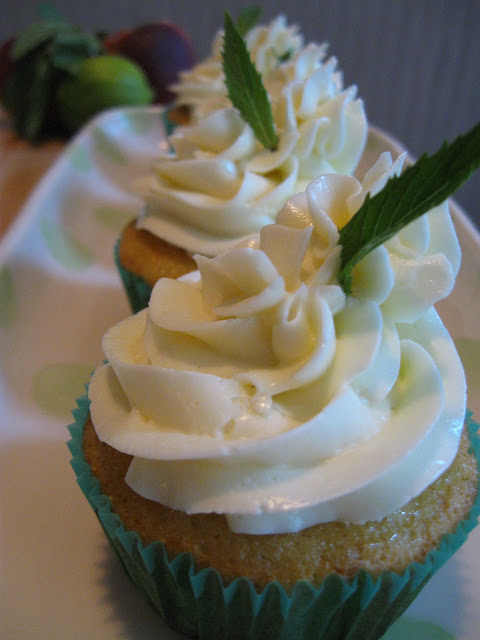
mojito, anyone?

These are mojitos... in cake form. And they are so, so, soooo good. The mint is from our garden... it had to get used, there is so much of it! Rum cake with a lime syrup glaze and mint swiss meringue buttercream... this mint buttercream is the most beautiful flavor I have ever created, seriously...


Mint Swiss Meringue Buttercream

fat handful of mint leaves
3 egg whites
3 tbsp water
1/2 c sugar
2 sticks unsalted butter
pinch cream of tartar

-heat sugar, egg whites, mint leaves and water in a double boiler or a bowl set over boiling water until the sugar is completely dissolved and mixture is bubbling.  Strain into a large bowl and beat with the cream of tartar with an electric mixer until opaque, glossy, and medium soft peaks form. Add butter, 1-2 tablespoons at a time until completely incorporated. 

June 16, 2012

sweet and simple

You guys are going to laugh at me for this one: super complicated white chocolate mousse with cherries...!


The recipe? 1 c heavy whipping cream, 6 oz chopped white chocolate. Put the chocolate in a medium bowl, bring the cream just to a boil and pour over the chocolate. Let sit for a few minutes, then whisk together until smooth. Refridgerate until cool, and beat with in electric mixer until fluffy. Layer with chopped cherries in a small clear bowl. Serve immediately for mousse texture.


Right? So hard... :) Happy summer!

June 10, 2012

just a taste

Today a classmate came over with her fiance to taste and choose a variety of samples for their wedding dessert bar.

Okay, it was seriously so much fun making all of these.

PS... sorry for the crumby picture. I FINALLY got a camera... now I have to get a battery charger! Better pictures soon..!

Much love, hope you all had a good weekend!


Left to right: dark chocolate petit fours with trawberry filling, vanilla petit fours with strawberry filling, chocolate macarons with chocolate ganache fillings, vanilla cheesecakes, peach cheesecakes, strawberry cream tarts, vanilla macarons, peach cream tarts.

chocolate cravings

Remember at the beginning of the year how I said I was going to be really good about posting in my blog?

Well, at the beginning of the year, I didn't have a baby yet. Get over it. She takes up 90% of my time (and I love her every minute of it). So baking is hard to do with a baby that can't feed herself, sit up by herself, or really, actually, do anything by herself.

That's when the soft carrier comes in. Although I have to admit I'm a little afraid of the authorities coming to get me... carrying around an infant on my tummy while I'm whipping around hot chocolate and hot pans.

Anyway, here's what I've been up to lately! The other day I made some "chocolate-covered strawberry" cupcakes for a girl's birthday... they were REALLY good, actually! I thought they needed more strawberry, but everyone else seemed to disagree. Unfortunately, didn't get any pictures before they got whisked away and gobbled up.

Then I made a chocolate cake, with white chocolate buttercream filling and milk chocolate meringue buttercream frosting. Should have switched them, and put the white chocolate on the outside... but I had less white chocolate than dark chocolate, and, I really really, REALLY needed chocolate.

REALLY.


This is, obviously, after four or five people had a go on it. I couldn't take a picture before it got eaten, which is a good sign, right?

And finally, these tiny petit fours have been a serious nuisance... the glaze just doesn't like me, or the heat, or both, but anyway, they finally worked pretty well and I think I've got the trick now.. :)


Chocolate Covered Strawberry Cupcakes
Cake
1/2 c canola oil
1 heaping cup very ripe strawberries, pureed (should give you about 1/2 cup of puree)
1/3 c milk
2 eggs
3/4 c sugar
1 c flour
2 tbsp cornstarch
1 tbsp unsweetened cocoa powder
1/2 tsp salt
1 tsp baking powder
1/2 tsp baking soda

Chocolate Buttercream
2 oz semi sweet baking chocolate
1/2 c cocoa powder
2 sticks unsalted butter at room temp
1/2 tsp vanilla
3 cups powdered sugar

-preheat oven to 350* and line a 12 cup cupcake tin with papers.
-beat eggs, oil, sugar, milk, and strawberries in a medium bowl until smooth and frothy. add dry ingredients all at once and beat until completely smooth. pour into lined cupcake tin and bake for 18-21 mins, until set. let cool completely before frosting
-in the meantime, melt chocolate in a stainless steel bowl set over a pot of boiling water (there should be at least 4" between the water and the bottom of the bowl, that way you will not burn your chocolate.... !) stir it constantly and when it is melted remove it from the heat and keep stirring. add the butter, cocoa, and vanilla and beat until combined. with an electric mixer, beat in powdered sugar until it has a piping consistency. this buttercream should be fairly thick, do not beat in too much air!
-pipe over cooled cakes!

I added some strawberry preserves to the tops of (only 4, because that's all we had) and I think they tasted better... Whatever you do, enjoy!

April 2, 2012

happy mommy = happy family

Which is why every mommy needs to eat Happy Mommy cookies.

Okay, so I actually named them "Happy Mommy" cookies because they are literally loaded with healthy-for-you stuff, and you could probably trick an unwary toddler (or grampa! as we've so discovered) into eating a "cookie" for breakfast. So they would make a mommy happy! And... they're just so yummy. They really turn out like muffin tops, which makes my family happy anyway, because apparently a muffin is too much or too difficult to eat... but who doesn't like just muffin tops?

Did I tell you? The last time I made some peanut butter granola bars and froze them, I ate half of one. My dad and sister ate the rest. So much for making food I could have for snacks... :)


Happy Mommy Cookies

1/3 c old fashioned rolled oats
1 2/3 c all purpose flour
1/3 c whole wheat flour
1/3 c raw unsalted sunflower seeds
1/3 c raw desiccated coconut or 1/2 c raw flaked coconut
1 tsp baking soda
1/2 tsp baking powder
2/3 c packed light brown sugar
2 large eggs
zest of one whole orange
juice of one whole orange
1/2 c (1 stick) unsalted butter
1 large very ripe banana, mashed
2 large carrots, peeled and finely grated

1. preheat oven to 350*. in a medium bowl, melt butter, stir together with orange zest, orange juice, mashed banana, carrots, eggs, and brown sugar until smooth and completely combined. add coconut and sunflower seeds.
2. in another bowl, whisk together flours, oats, baking soda, and baking powder. add to wet mixture and stir until completely combined.
3. take 2 tbsp of dough and roll into a ball with your hands, place on a parchment lined cookie sheet, no less than 2" away from the next ball- they will spread out!
4. bake for 14-16 mins or until the bottoms are brown and tops are golden. let cool (or not!) before eating.
to freeze: wrap each cooled cookie in a double layer of plastic wrap and place wrapped cookies in a gallon, double-zip bag. they will keep for about a month like this... unless they get eaten!

March 28, 2012

the thing about papaya

Is that, in my experience, they usually do not have a lot of flavor... and they smell like feet. Or worse. But I bought one yesterday at Whole Foods and remembered that we have a jar of poppy seeds at home, and for some reason decided they would go well together. Poppy seeds are a little peppery, and the papaya is slightly sweet and balances it nicely.
And of course, by now you all know my obsession with curds, right?? I REALLY wanted to make papaya curd!!

First of all- I googled papaya curd and I got 1. a minute-by-minute replay of some contestant on chopped who won even though his papaya curd did not do so well and 2. a listing of restaurants in New Delhi that sell papaya curd. Not very helpful. So, I made it up! It worked really well, actually. The flavor is very light and you can taste the papaya (but not smell the feet!). Poppyseed cookies are just a simple butter cookie recipe, but I used baking powder instead of baking soda, which is where my mistake lies- they were a little too... poofy, for what I was going for. Anyway, one day I will have the science of rising agents down perfectly, in the mean time, enjoy the poofy papaya poppyseed cookies!


Poppyseed Butter Cookies

1 stick unsalted butter, room temp
1 c cold flour
1/2 tsp baking powder
1/2 tsp salt
1/2 c white sugar
1 large eggg
1/2 tsp vanilla extract
scant tbsp poppyseeds

-cream butter and sugar until light and fluffy, beat in egg until combined. add flour, baking powder, salt, poppyseeds, and vanilla with a wooden spoon until the dough comes together completely. place in the refrigerator and preheat oven to 375*.
-when oven is to temperature, remove dough from refrigerator and roll into 1" balls to place on a cookie sheet with a layer of parchment paper. flatten each ball with your thumb and bake for 10-11 mins or until the bottoms of the cookies are just golden brown. remove from oven, cool for 1 minute and press a small spoon into the top of each cookie to create an indent.
-let cool completely. can be stored wrapped up to 1 week in the refrigerator.

(This is the point, after they cooled, that I piped in the papaya curd. Recipe later!)